Author Archive
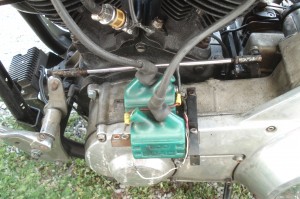
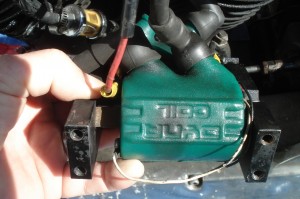
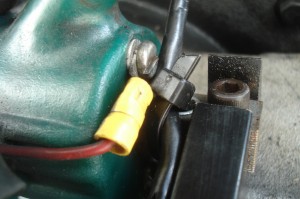
Ev ery time I pull the cover off my dual , dual tower, 3 ohm, dual fire coil pack I seem to get a little dizzy lookin at the wiring. Just saying it all is pretty daunting! What if I can’t remember how to put it back together. I have a Crane HI2 single fire electonic ignition with mechanical advance. What if I hook it up wrong? Where can I find a wiring diagram? The answers to these questions respectively are: take a lot of pictures so you don’t have to remember; your bike will either not fire at all or it will run like hell since this is a single fire ignition; and you can read all about this fine module at this link. In a nutshell, red wire from module goes to common between the two coils and the ignition key hot wire. The black wire fires the front cylinder. The white wire fires the rear cylinder.
  The polarity used on the coils doesn’t really matter. They should be connected to the bike for ground though. In my images the second set of plug wires has been removed for visibility of the other components.
This winter I went back into my old shovel to put new rings in. Winter before last I tore things down just for a peak and finding a practically new build I put her back together after breaking the glaze on the cyclinders with the old rings. Don’t try it – it generally does’t work. So this wlast weekend a new set goes in. Got things buttoned up and can’t get any fire. Found a bad coil tower and what must be some bad connections. Ordered up a new pair of 3 ohm, dual tower, dual fire dyna coils, a bitch bar with FXR side rails, saddlebag standoffs (we’ll see how that all works with the above mentioned bitch bar side covers), and a new Accell “dual plug” plug wiring kit from jpcycle.com. My experience with these folks my stuff will be here by mid-week. I should be up and running this weekend if I get lazy and don’t do it sooner.
I’m really ready for spring to officially be here. Ride safe.
The annual blessing of the bikes run will take place on Sunday, May 1, 2011. The service takes place on the grounds of Bald Knob Cross located just outside of Alto Pass, Illinois about 10 miles south of Murphysboro on hiway 127.
Registration at 9:00a.m. in Anna at Shawnee College (old Wal-Mart) parking lot; $10 per driver / $5 for rider; first bike out at 10:00a.m.; last bike in at 2:00p.m. at Anna Heights Baptist Church Family Life Center
Sounds like fun!
April 25th, 2010 will be the date for the 18th annual Blessing of the Bikes to be held at Bald Knob Cross in Alto Pass, Illinois. Slated as a “all day” event there is sure to be something for everybody – whether you deserve blessings or not 😎
Ride safe – get there alive
Front brakes are good
No matter how good your back brake is it will be three times as effective at stopping your bike if you have front brakes to assist in the process. A common failure for front brakes is when the seal blows and begins leaking precious DOT-5 onto your rotor. This tutorial intends to explain how to proceed with this repair.
Remove caliper from fork leg
The caliper(s) are attached to the lower legs of your front end using a pair of fixed depth, limited thread bolts. One is longer than the other. The longer one goes into the top hole and the shorter one in the bottom. The back side of the caliper (without the puck in it) has nut cutouts inwhich you place the nuts that correspond to these bolts. The pupose of these bolts is strickly to hold the caliper in place. Once you have removed these two bolts and nuts you can slide the caliper back towards the bike frame and up and off of the rotor.
Break the caliper halves
On the back side of the caliper you will find a 9/16 (or was it 5/8) bolt. You must remove this bolt in order to split the caliper. The two halves should seperate very easily once this bolt is removed. Lay the caliper in your hand with the ouside facing up and lift off the outside half. This will leave behind the spacers/shims, pads and pins that make up the brake unit. Not which shim goes on the front and back sides of the mechanism as they are not the same.
Check your master cylinder brake fluid level and don’t let the master cyclinder start sucking any air by topping off the fluid as needed. With the caliper seperated and holding the puck side in one hand slowly pump the from brake lever. With each pump you should see the puck moving further and further out of its seat in the caliper. As it gets near to its end of travel (almost an inch) you need to pay attention and have a catch can of some sort since when the puck comes out there will be quite a bit of fluid filling the void left behind as we pumped out the puck. Once the puck is clear of the housing dump the brake fluid from the caliper into your catch can.
Remove old dust boot and seal
You will see the dust boot on the outside face of the caliper half. It is very soft and easily removed by grabbing it anywhere you can and working the retining lip out of its grove in the caliper body. Futher recessed inside the caliper you will see a wide rubber band looking ring. This is the actual seal itself. There is plenty of slop in the groove that the seal sits in. Use your fingernail to catch and remove the old seal. This part couldn’t be simpler.
Replace seal and dust boot
Clean the caliper as needed to insure that there is no debris in any of the retaining slot within the caliper body. Get the new seal from your seal kit and slide it into the seal slot in the caliper. Repeat this process with the dust boot making sure that the retaining ring fits neatly into its groove in the caliper.
Press puck back into position
Crack the brake bleeder open pretty wide and leave it that way. Clean the puck of any foreign debris of dirt. Inspect the puck for any obvious signs of wear. Replace it if it contains any deep grooves, gouges or rough spots. Insert the puck into the duct boot and slide it through the seal as far as you can (by hand.) Get one of the old brake pads you are replacing and place it over the puck face. Get a C-clamp that is large enough to span the caliper body. Slowly apply clamp pressure until the puck is more or less even with the face of the caliper body. Tighten the bleeder valve.
Re-assemble the caliper
Replace any brake pins that show grooves or anything that could interfere with the brake pads sliding on the pins. insert the pins into one or the other half of the caliper. Place the corresponding shim onto the pins. Next place a new pad with the fiber side facing the rotor. Place the second pad the same way such the the fiber pads are facing each other toward the center of the caliper. Install the remaing shim (you did remember which one went where right?) Align the pins to the holes in the caliper backing half and bring the two halves back together. Align the aligment pin and replace the bolt that holds them together.
Replace caliper on lower leg mount
Place a nut into each of the recessed nut locker recesses and hold them there with one finger on each. Align the caliper with the rotor so that the rotor inserts between the pads. Slide the caliper over the rotor to where it will align with the mounting gussets on the lower leg. Insert both bolts so they will hold the nuts in place. It might take a couple of tries to pull this off without dropping one of the nuts. It isn’t rocket science though – you’ll figure it out! Tighten the mounting bolts using an allen wrench.
Bleed the air from the caliper
Use standard bleeding procedure to remove the air in the caliper. Pump, hold, loosen, bleed, tighten and repeat until you get no air bubbles coming from the caliper and the brake lever is firm. Here again pay attention that you do not allow the brake fluid resevoir to get so low that it lets the master cylinder suck air. Top it off as needed during and after bleeding.
Repeat for second caliper (dual disk front ends)
For a dual disk front end this procedure will need to be repeated for the second caliper.
Hope this helps for those of you whom haven’t learned this procedure yet. Please let me know of any corrections or clarifications that would be helpful.
Use this category to announce any upcoming events related to Harley Davidson and the people that ride them.
Use this forum to pose the “where can I find a” type questions or answers to somebody else’s question on “where to find” whatever related to Harley Davidson motorcycles.
Use this topic to post questions and answers to questions about “how to do” something related to Harley Davidson motorcycles.