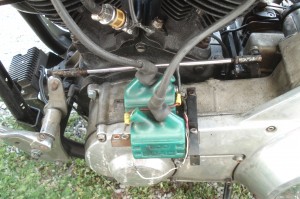
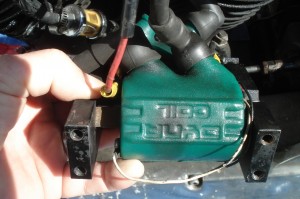
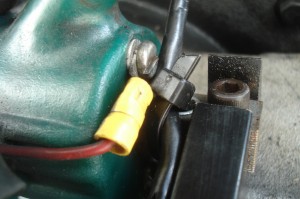
Ev ery time I pull the cover off my dual , dual tower, 3 ohm, dual fire coil pack I seem to get a little dizzy lookin at the wiring. Just saying it all is pretty daunting! What if I can’t remember how to put it back together. I have a Crane HI2 single fire electonic ignition with mechanical advance. What if I hook it up wrong? Where can I find a wiring diagram? The answers to these questions respectively are: take a lot of pictures so you don’t have to remember; your bike will either not fire at all or it will run like hell since this is a single fire ignition; and you can read all about this fine module at this link. In a nutshell, red wire from module goes to common between the two coils and the ignition key hot wire. The black wire fires the front cylinder. The white wire fires the rear cylinder.
  The polarity used on the coils doesn’t really matter. They should be connected to the bike for ground though. In my images the second set of plug wires has been removed for visibility of the other components.
This winter I went back into my old shovel to put new rings in. Winter before last I tore things down just for a peak and finding a practically new build I put her back together after breaking the glaze on the cyclinders with the old rings. Don’t try it – it generally does’t work. So this wlast weekend a new set goes in. Got things buttoned up and can’t get any fire. Found a bad coil tower and what must be some bad connections. Ordered up a new pair of 3 ohm, dual tower, dual fire dyna coils, a bitch bar with FXR side rails, saddlebag standoffs (we’ll see how that all works with the above mentioned bitch bar side covers), and a new Accell “dual plug” plug wiring kit from jpcycle.com. My experience with these folks my stuff will be here by mid-week. I should be up and running this weekend if I get lazy and don’t do it sooner.
I’m really ready for spring to officially be here. Ride safe.
The annual blessing of the bikes run will take place on Sunday, May 1, 2011. The service takes place on the grounds of Bald Knob Cross located just outside of Alto Pass, Illinois about 10 miles south of Murphysboro on hiway 127.
Registration at 9:00a.m. in Anna at Shawnee College (old Wal-Mart) parking lot; $10 per driver / $5 for rider; first bike out at 10:00a.m.; last bike in at 2:00p.m. at Anna Heights Baptist Church Family Life Center
Sounds like fun!
April 25th, 2010 will be the date for the 18th annual Blessing of the Bikes to be held at Bald Knob Cross in Alto Pass, Illinois. Slated as a “all day” event there is sure to be something for everybody – whether you deserve blessings or not 😎
Ride safe – get there alive
Went for a little ride yesterday (68 degrees on March 30? I’m gone.) Rode out to my sons ranch to check on his progress with some fence. Really nice day with a bit of gusty wind. Hung out on the ranch for a bit and then headed back home. I’m about 300 feet from home, slowing to make a right hand turn onto my road.
I see 4 kids playing “hood” basketball in their front yard. As I approach, they lose control of the basketball and it heads into the street. I adjust my speed accordingly to allow the ball to get past me (it was coming from my right side) and to make sure that there wasn’t going to be a kid chasing it.)
As I get within a few feet of the ball and either an act of God or a random gust of wind stops the ball in its and(unfortunately) my tracks. I hit the damned thing with my front wheel. You might think that the ball would bounce off this 600 pound iron horse like a club smacking a golf ball. Yup, you might think. Instead, the wheel rode UP onto that damned ball, the front end slapped all the way left and then rolled off the left side of the ball onto the road cocked fully left.
Thud. Bang. I’m laying in the street next to my bike. A BASKETBALL??? I couldn’t believe it. Fortunately, I wasn’t going more than 10-15 MPH at the time of impact. My leather did its job and isn’t much the worse for the experience. I got three patches road rash and so did the bike. A bicyclist was passing by and stopped to help me pick Mabel (my bike’s name) up off the road and push her to the curb. After some examination and recovery time I got her back into neutral and started. Finished my few hundred feet to the house and put her in the garage. Went inside to get momma to bandage me up and see how bad it really was.
I have ridden many many tens of thousands of miles over 25 years experience and only been all the way down two or three times. I wouldn’t ever even believe a basketball could drop you if I didn’t experience it myself. So, watch out for basketballs. White Men on Harleys can’t jump!
This post is a continuation of a thread that starts here. The previous post in the series (Heads and Cylinders to Machine Shop) is here.
Read the rest of this entry »
The first of the Belleville swap meets will be held on Sunday, April 11, 2010 at the Belleville Fair Grounds just off hiway 13 in Belleville, Illinois. They generally have one in the spring and another in the early winter. Lots of venders – buy, sell, trade. I’ll be there.
Ride safe!
I don’t have the tools necessary to fully disassemble the heads or to grind valves and seats so I started looking for a local machine shop to get the heads checked out. Turns out that even in this little town of 10,000 there is a local shop named Competative Edge. They are car racers. Build and maintain their own dragsters. Might know a little bit about engines. Off we go.
Two days later I got my heads. Good news. Valves are good. Seats are good. Front head valve guides COULD be replaced if I had a set but are still very usable. A LOT of carbon in the combustion chamber. Enough that there could have been some leakage around the valves while they are seated. Good news is that carbon cleans up pretty easy 🙂
Cylinders appear to be free of taper so I’m going to just break the glaze on them and go back together with the same rings tomorrow afternoon. Hoorah! Back on the road this weekend with all the new stuff I have accumulated over the winter. Ought to be a good summer or riding coming up.
I’ll try to document the assembly process with a lot of pictures.
Ride safe.
This post is a continuation of this thread.
Having removed the heads as described in this post we are ready to inspect the barrels and remove them if necessary. Here too you can either roll the bike while in gear or use the started to roll the motor over so you can inspect the wall of the cylinders. In my case I was surprised to find I could still see cross hatching from the honing stones! Nice. However, since I haven’t been in to this motor before I wanted to shake the rods and look at the piston skirts and flywheels. So I decided to remove the cylinders regardless of the condition of the cylinder walls.
The front cylinder is different than the back and cannot be interchanged. Typically the front jug casting number will be an even number while the rear is an odd number. In my case these castings are 16568-78 in the front and 16587-78A in the rear. The numbers not being of the same revision tells me that (at least) the rear cylinder has been blown up and replaced.
Each cylinder is held in place with 4 base bolts and triangular base washers. Roll the motor over until the pistons are bottom dead center. Loosen and remove the nuts from each cylinder. Carefully free the cylinder from the base. Be sure that you don’t let the piston fall to the front or rear when it comes free from the cylinder. I then roll the motor over to the point the piston on the front cylinder is being pulled down into the engine case. I place a socket extension through the piston wrist pin and then very carefully roll the motor over until the extension is resting on the case’s base gasket surface. This way when you pull up on the rear cylinder you will not accidentally pull the piston down risking damage to the piston. Once secured, remove the rear cyclinder in the same manner as the front.
That’s pretty much got us to where it time to see the local machine shop to spec your cylinders and ring end gaps to see if you need to bore and replace pistons or not. In my case I found what appears to be a brand new piston in the rear and one with only a small amount of carbon on the front. All of the observations going to support my initial theory about this bike. The winner blew it up, fixed it and sold it. Cool so long as there is no hidden damage deeper inside.
With the guts exposed I got the check out the nice set of S&S rods and fly wheels making up the guts of my bike. Examination of the serial numbers on the flywheels reveals a 4.5 inch stroke (2SL trailing in the serial number) making this baby a 93 incher as I suspected in the beginning. I don’t have a tool for measuring the bore of the cylinder very accurately but I do see .090 on the rear piston. .090? Seems like a LOT over. Can’t see what the front says due to carbon. Definitely has to be accurately measured and put in balance it isn’t.
3/3/2010 update: From what I can find on the net it seems that the pistons are S&S stroker pistons and they seem to be measured against a stock 74 c.i. cylinder. When using the 74 as the baseline then an 80 c.i. cylinder is already .060 over (according to S&S’s spec sheets.) Therefore, my .090 pistons are really .030 over the stock 80 c.i. bore. I like that a lot better than thinking my cylinders are bored to .090!
Now I know what’s in there and that the rods feel pretty damn good. Machine shop here we come.